
We all agree that a clean windshield or clean glasses work better and are more pleasing to look through. Microscopes work better when the optics are clean, too. Dust and smears reduce the resolution, generate artifacts, and generally degrade the image, sometimes to the point of making the microscope useless. Below are a few basic guidelines we use to clean microscope optics. For best results, follow these steps in increasing order and NEVER soak the optic in any solvent!
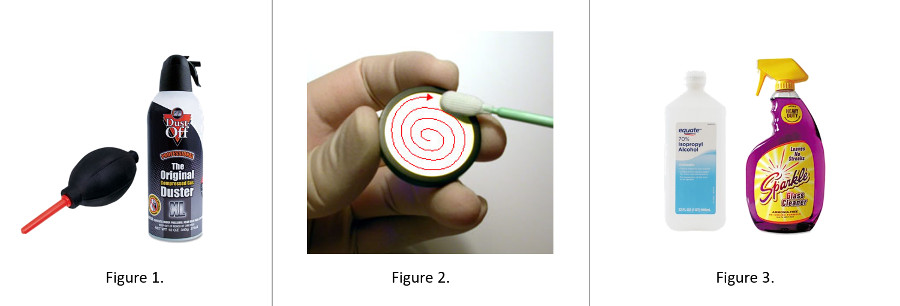
- Use a puffer (Figure 1)
- Remove surface dust by blowing air across it, and you only need a puffer or compressed air to do this. This also avoids potential for scratching or smearing optical surfaces.
- Use lens tissue
- Lens tissue has no lint, and lint can cause scratches. We avoid using Kimwipes, too, as they may be abrasive. Gently wipe an optical surface in a circular pattern, beginning in the center and spiraling outward (Figure 2). Repeat. FYI, facial tissue contains a wetting agent that may add smears to the glass surface.
- Use water or warm breath
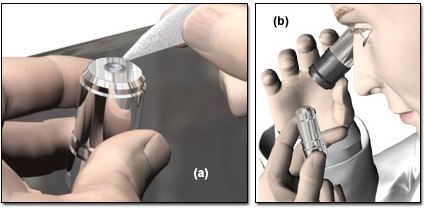
- In combination with Step 2, a warm breath may be sufficient to remove the dust, debris, and some smears. You may also wet the lens tissue slightly before wiping. We will also wrap the lens tissue around a cotton-tipped applicator stick or Q-tip. Alternatively, you can fold the lens tissue into a point (Figure 4a; courtesy of https://micro.magnet.fsu.edu).
- Use alcohol or lens cleaner (WEAR NITRILE GLOVES)
- Alcohol or lens cleaning solution (Figure 3) is the next solvent after water/breath. One of our favorites is Sparkle glass cleaner, but dilute this 1:1 with distilled or deionized water (a.k.a. Milli-Q water). 70% isopropanol or 70% ethanol is also acceptable, but not denatured alcohol. Be careful when cleaning the eyepieces as these solvents may damage the rubber eyeshields. Wrap lens tissue over applicator stick or Q-tip as above, and slightly dampen with solvent before wiping. Work in circular/spiral motion from the center outward. Repeat.
- Use stronger solvents (WEAR APPROPRIATE GLOVES), or seek professional help
- In some cases, and with some stuck-on substances like dried-on immersion oil, you may need to use other solvents such as xylol or a 1:1 mixture of ether-ethanol. IMPOTRANT! DO NOT SOAK THE OBJECTIVE IN THE SOLVENT as this may soften the cement securing the lens elements. Other organic solvents may also be used for more stubborn crud (Residual Oil Remover, pure petroleum ether, etc.). Follow same procedure as in Step 4, and use sparingly!
One final tip. It is easier to inspect and clean objectives if they are removed from the microscope. Remove one of the eyepieces and look through it the “wrong way” (e.g. from the back; Figure 4b) at the lens – – it’s a handy 10x magnifier! With a few seconds of practice, you can see smears, dust and even damage to the lens.
Enjoy your clean microscope and, to maintain peak performance, remember to clean those optics on a regular basis.