The short answer to the title question is because white balancing produces better images, improves consistency, discriminates detail, balances contrast, and refines resolution. If you are using a microscope with a color digital camera, you should definitely take advantage of the white balance feature. But what is white balance, and when and how should you use it?
What is White Balance?
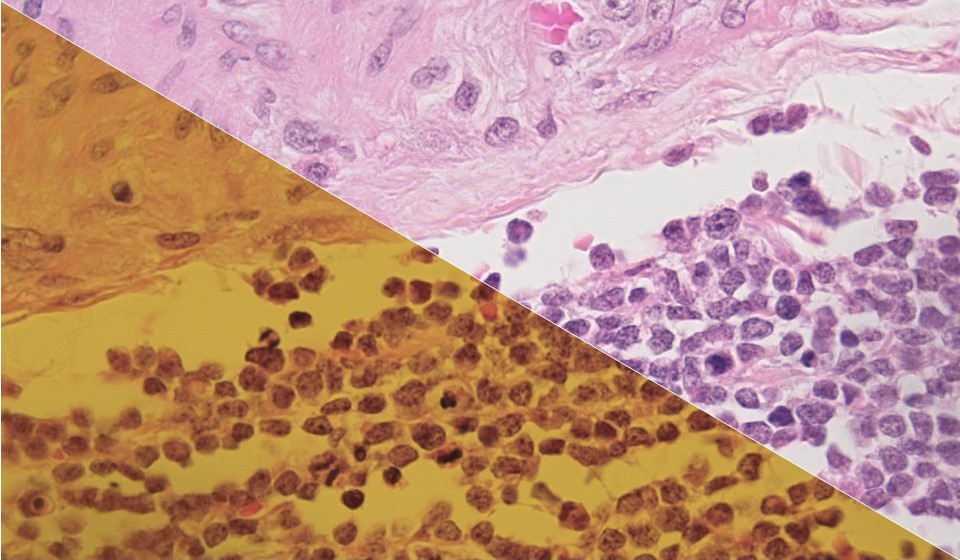
Quite simply, white balancing is the way we tell a color camera what is white or, at least, neutral (gray). Camera sensors “see” color according to the color filters that cover the camera sensor – each pixel only "sees" one color: red, green or blue. Depending on the specimen, the pixels will have different intensities and it's this mixture that recreates the specimen in an image. When you place a neutral gray or white object on the stage and white balance a camera, the camera makes all the pixels the same intensity – equal amounts of red, green and blue. Now the camera knows what is white or gray, and the colors in the specimen are rendered
Why Does White Balance Change?
The color characteristics of your microscope’s light source varies every time you turn it on. LED light sources don’t vary as much as halogen lights, but nothing is perfectly stable. If you have a halogen light, you’ll notice that when the voltage is turned down, the light looks yellowish; turn the voltage up and the light appears white (see Figure 1; used with permission from https://microscopes.unitronusa.com/news/what-is-it-about-white-balancing/). You will also notice that the color of your sample appears distorted in different color illumination. White balancing can correct for these variations in light color and normalize your imaging across imaging sessions. After white balancing the camera, it is important not to adjust the light intensity, especially with a halogen light source – doing so will change the color characteristic of the illumination. For this reason, it is recommended to 1) adjust image brightness using the exposure control in the camera software, or 2) use neutral density filters to attenuate the light intensity, rather than turning down the voltage (LED light sources may be the exception).

Figure 1. Impact of Halogen Lamp Voltage on Illumination Color in Microscopy. When Should I Use White Balance?
You should use white balance at the beginning of every imaging session, after your light source has warmed up, and after you set the light intensity. If you will be imaging with different magnification objectives, adjust the light intensity for the highest magnification objective then white balance the camera. As mentioned above, reduce camera exposure time or use neutral density filters to reduce the light intensity for lower magnification objectives – neutral density filters don’t change the color of the illumination. Alternatively, you can white balance before every image you take. Whether the images will be used for qualitative or quantitative analysis, white balancing before every image ensures consistency and comparability between them.
How Do I White Balance My Camera?
First, place a specimen on the stage and focus using the highest magnification objective that you plan to use for imaging. Perform Köhler illumination including condenser iris diaphragm adjustment for the objective being used.
Next, locate the white balance function on your camera or in your camera software. Most cameras have a function for white balancing, and some may even have a button on the camera housing. Camera software may have a software button to press for white balancing, or software may have the option for locking white balance that you turn off to white balance, then turn back on to keep that setting. The white balancing process is similar across camera manufacturers. If your camera has a histogram function, you may find it informative and useful, plus you can see the impact of white balancing on the camera’s color channels (red, green and blue) as well as in the image (see Figure 2). Adjust the light intensity to about 70%-80% of maximum on the histogram, or approximate a medium brightness if you don’t have a histogram. Then without changing the light intensity, move the specimen out of the field of view. Click the white balance function on your camera or in its software. The background should now be a neutral gray, and the channels on the histogram should overlap. White balancing the camera does not affect what you see through the eyepieces.
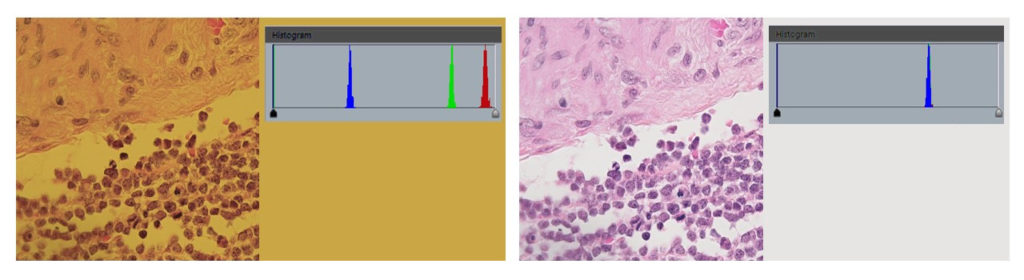
Figure 2. Appearance of imaging field, histogram and specimen before (left panel) and after (right panel) white balancing. One final recommendation. Automatic white balancing may seem very attractive -- your sample will always have the right color. False. The camera adjusts white balance constantly as you move a specimen across the stage or with different samples. Therefore we recommend locking the white balance after you set it.
White balancing is a best practice in microscopy and, as with good experimental design, should be routine in your lab, too.
Thank you for reading.
